


Assignment for this week:
Group assignment:Compare as many tool options as possible
Individual assignment: Write an application that interfaces a user with an input &/or output device that you made
- IntroductionThis week was about application programming. We should write an application that interfaces a user with an input &/or output device that made by us. Due to the Covid19 pandemic, we didn’t have access to the lab to make a board, so I was given a permission by the instructor and evaluator to use Arduino sensors instead.
It was a very interesting experience for me, as I tried two different platforms: Processing and Blynk , to do the assignment. Both of them seem easy to use, as there are a lot of tutorials and very good documentation, which I will link to below, but when you start actual programming, you can face problems and issues, which are pretty tricky and not described anywhere. I think I need more time to understand more about application programming, but so far if I compare, I liked Processing more than Blynk, because here there is more freedom and less limitations, while in Blynk you should pay for some things.
Here are the tutorials which I referred to and found useful: - A ball game using Arduino joystick and ProcessingI was familiar with C++ and Javascript before joining FabAcademy, so I wanted to try something else for this week. I want to learn Python for a long time, but want to learn it fundamentally and feel like one week is not enough for it.
From the rest of the programs and languages presented by Neil during the lecture , Processing was more interesting for me and I decided to start with it. Besides that, Arduino IDE is based on Processing and as we don’t have anything but Arduino boards now, it would be convenient to work in Arduino IDE along with Processing.
In this project I connected the 2-axis joystick to the Arduino board and then connected Arduino IDE to the Processing by serial. This way I could use the data from joystick and visualize it in the Processing.
I decided to have a “target” circle, which is red and a white ball, which can be controlled by the joystick. The aim of the game is to put the white ball into the red circle and press the joystick. So first of all let’s understand how the Arduino joystick works.This is a self-centering spring loaded joystick, meaning when you release the joystick it will center itself. The goal of the joystick is to communicate motion in 2D (2-axis) to an Arduino. This is achieved by housing two independent 10K potentiometers (one per axis). These potentiometers are used as dual adjustable voltage dividers, providing 2-Axis analog input in a control stick form. This joystick also contains a switch which activates when you push down on the cap. The lever works no matter what position the joystick is in. In order to read the joystick’s physical position, we need to measure the change in resistance of a potentiometer. The values on each axis can vary from 0 to 1023. So, if the stick is moved on X axis from one end to the other, the X values will change from 0 to 1023 and similar thing happens when moved along the Y axis. When the joystick stays in its center position the value is around 512. (image credits lastminuteengineers.com)
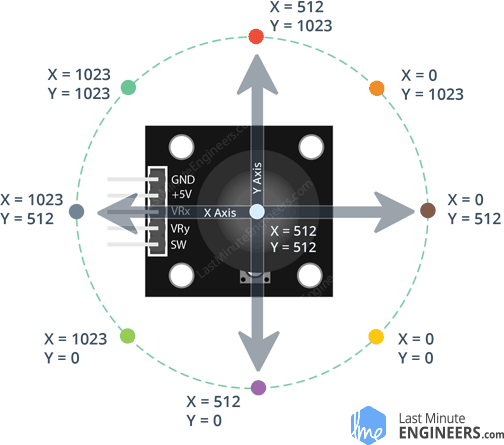
I found a simple project with joystick here and developed that for the game.
I did wiring this way:- Ground pinout of joystick connected to the GND of Arduino
- VCC pinout of joystick connected to the 5V of Arduino
- VRx gives readout of the joystick in the horizontal direction (X-coordinate) i.e. how far left and right the joystick is pushed. I connected it to the A0 of the Arduino
- VRy gives readout of the joystick in the vertical direction (Y-coordinate) how far up and down the joystick is pushed. I connected it to the A1 of the Arduino
- SW is the output from the pushbutton. It’s normally open, meaning the digital readout from the SW pin will be HIGH. When the button is pushed, it will connect to GND, giving output LOW. That’s why in the serial we pass the opposite value to the Processing. I connected SW to digital pin 8 of Arduino.
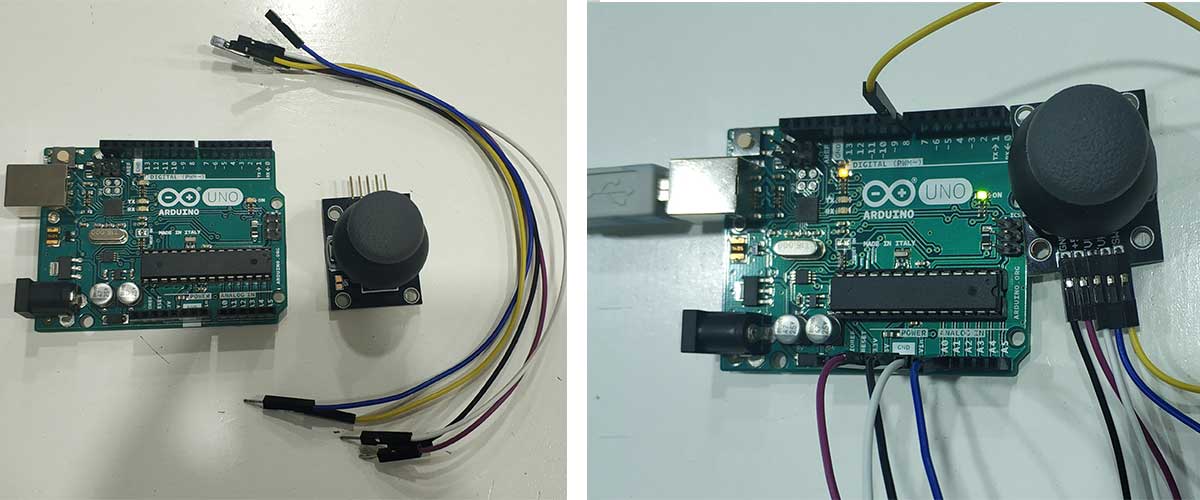
Now it’s time to connect Arduino to the computer and upload the following code from Arduino IDE to the board:
int xValue = 0 ; // read value of the X axis
int yValue = 0 ; // read value of the Y axis
int bValue = 0 ; // value of the button reading
void setup()
{
 Serial.begin(9600) ; // Open the serial port
 pinMode(8,INPUT) ; // Configure Pin 8 as input
 digitalWrite(8,HIGH);
}
void loop()
{
 // Read analog port values A0 and A1
 xValue = analogRead(A0);
 yValue = analogRead(A1);
 // Read the logic value on pin 8
 bValue = digitalRead(8);
 // We display our data separated by a comma
 Serial.print(xValue,DEC);
 Serial.print(",");
 Serial.print(yValue,DEC);
 Serial.print(",");
 Serial.print(!bValue);
 // We end with a newline character to facilitate subsequent analysis
 Serial.print("\n");
 // Small delay before the next measurement
 delay(10);
}
After this I opened the Processing application downlaoded from official website and run the following code.
import processing.serial.*; //import the Serial library
Serial myPort;
int x; // variable holding the value from A0
int y; // variable holding the value from A1
int b; // variable holding the value from digital pin 2
PFont f; // define the font variable
String portName;
String val;
float x1; // variable for random x coordinate of the circle
float y1; // variable for random y coordinate of the circle
void setup()
{
 size ( 512 , 512 ) ; // window size
 // we are opening the port
 myPort = new Serial(this, Serial.list()[2], 9600);
 myPort.bufferUntil('\n');
 // choose the font and size
 f = createFont("Arial", 16, true); // Arial, 16px, anti-aliasing
 textFont ( f, 16 ) ; // size 16px
 x1 = random(1024);
 y1 = random(1024);
}
// drawing loop
void draw()
{
 fill(0) ; // set the fill color to black
 clear() ; // clean the screen
 fill(255,0,0); // set the fill color to red
 ellipse(x1/2, y1/2, 50, 50);
 fill(255) ; // set the fill color to white
 textSize(16);
 text("Press any key to restart the game",10,20);
 ellipse(x/2,y/2, 50, 50);
 if (b == 1 && abs(x-x1) < 25 && abs(y-y1) < 25) // check if the button is pressed and ball is on the circle
 {
 textSize(64);
 fill(0, 255, 0); // set the fill color to green
 text("WELL DONE!!!", 100, 300);
 // myPort.stop();
 // setup();
 }
 else if (b == 1 && (abs(x-x1) >= 25 || abs(y-y1) >= 25)) // the button is pressed but the ball is not on the circle
 {
 fill(255, 0, 0); // set the fill color to red
 textSize(32);
 text("TRY MORE!!!", 100, 300);
 // draw a circle with a certain coordinates
 fill(255);
 ellipse(x/2, y/2, 50, 50);
 }
 else
 {
 //draw a circle with a certain coordinates
 fill(255);
 ellipse(x/2,y/2, 50, 50);
 }
 // display data
 textSize(16);
 fill(255);
 text("X="+(1023-x)+" Y="+(1023-y),10,50); // coordinates of the ball
 // we display data
 textSize(16);
 fill(255, 0, 0);
 text("X="+(1023-x1)+" Y="+(1023-y1),10,70); // coordinates of the circle
}
// fuction or restarting game when a key is pressed
void keyPressed() {
 myPort.stop();
 setup();
}
// data support from the serial port
void serialEvent(Serial myPort)
{
 // read the data until the newline n appears
 val = myPort.readStringUntil('\n');
 if (val != null)
 {
 val = trim(val);
 // break up the decimal and new line reading
 int[] vals = int(splitTokens(val, ","));
 // we assign to variables
 x = vals[0];
 y = vals[1] ;
 b = vals[2];
 }
}
Some explanations for the code
- My idea was to put ball exactly on the circle, meaning they both should have the same coordinates. But when I first try with that, I realized that it’s impossible as the joystick is very sensitive. besides that you move it while pressing, so it would never work. That’s why I decided to have some range for the two coordinates. In the code below I set a condition, that if the difference between both x and y coordinates of two objects are not more than 25, then we consider them as matched. And if the button is pressed (b == 1), you achived your goal.
if (b == 1 && abs(x-x1) < 25 && abs(y-y1) < 25) myPort = new Serial(this, Serial.list()[2], 9600);
Here in Serial.list()[2] the number 2 indicates which port you are connected to. Remember, that counting starts from 0, so in my case I’m connected to the third port in the list.- Please note, that the serial monitor of Arduino should be closed, as Arduno and Processing use the same serial and if it’s used by Arduino, it will show busy in Processing.
And the video with the result:
The problems I have faced and issues to be fixed:
- I wanted to freeze the “Well done” text for a second and restart the game after that. For that I have added the piece of code:
 myPort.stop();
 setup();
which breaks the loop and goes to the beginning but it didn’t work and I didn’t find the reason so far. - When I start the program, it takes time for data to process and during that time the white ball is being in one of the corners of the screen. It’s being uncontrollable and the only way is to restart the program. For that I have added the keyPressed() event which allows to restart the game by pressing any game on the keyboard.
 void keyPressed() {
 myPort.stop();
 setup();
 }
I have to do more research on this as well. - Joystick is not well controllable and sometimes it’s hard to press it, when the ball is in the corner.
Here you can find the file with the Arduino code and the code for Processing to lounch the game.
- Checking temperature and humidity remotely using Blynk appI decided to do a project using Blynk, as I like everything, which can make life easier. With Blynk you can download the app on your phone (only Android and iOS so far), download Blynk library, which is an extension that runs on top of your hardware application. It handles all the connection routines and data exchange between your hardware, Blynk Cloud, and your app project. Afterwards, connect hardware. To get your hardware online and connect it to Blynk Cloud, you would need a device Authentication Token. Once you download the app you will be able to generate Auth Token for every device. Blynk is very convenient, as you just have to spend some time learning Blynk basics. It will help you to easily build new projects or integrate Blynk into your existing project. There are a lot of examples and tutorials to get you started.
In the example of my project, I will show you how to work with Blynk step by step. I used DHT11 Digital Humidity & Temperature Sensor , as an input device and transferred data to my Blynk app via cloud.- Connect the sensor to Arduino board in following configuration:
- Ground pin to Ground on Arduino
- Vin pin to 5V on Arduino
- Data pin to digital pin 2 on Arduino
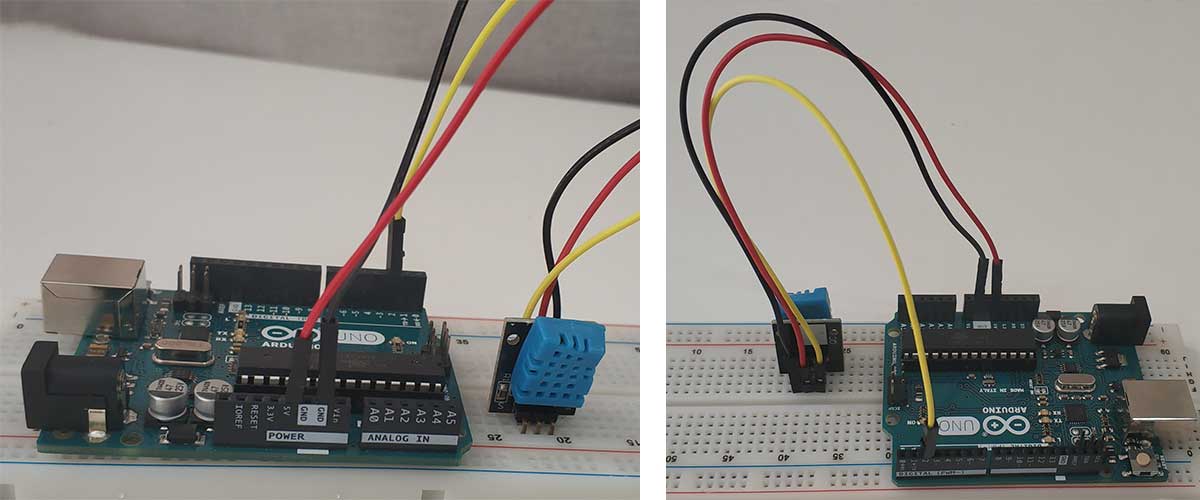
- Download the Blynk app. For Android follow this link and for iOS this one.
- Open the app and create a new project. Here you should name your project, choose the device and connection type and press Create. And Auth Token will be sent to your email address, which will be used later on.
- Connect the sensor to Arduino board in following configuration:
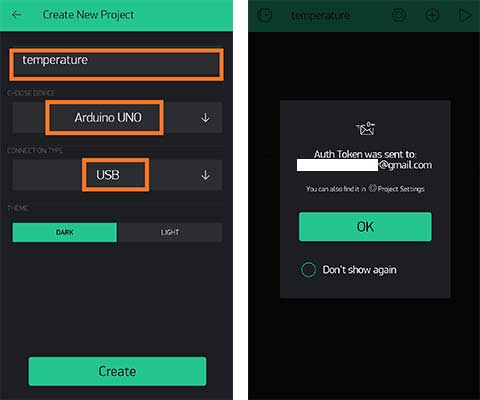
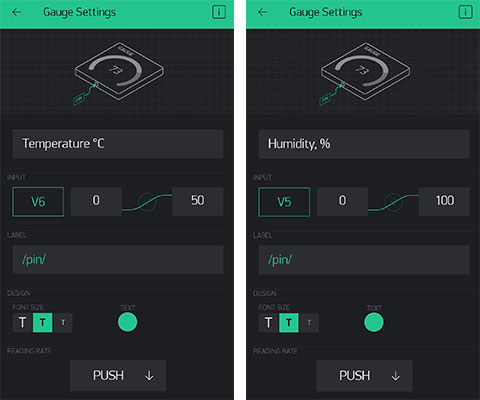
- Now in the project page we can choose what type of tools we need. If we press on on the top right of the menu bar or just tap on the screen, the Widget box will appear. We can choose the one, which is more convenient for us. But there is a limitation: by default there is an amount of “energy” – units available there and each widget requires a certain amount of energy. So we can’t use as many widgets as we want without buying extra “energy”. In my project I added two Gauges – for temperature and humidity. You can customize the properties such as name of the Guguge, scale, units, and the most important here is to set up the proper port on which app should receive the data. On my project I have V5 (Virtual port 5) for the humidity and V6 for the temperature. In the “Reading rate” section you should set the interval for updating the data. If you select PUSH , the interval will be set up from the program.
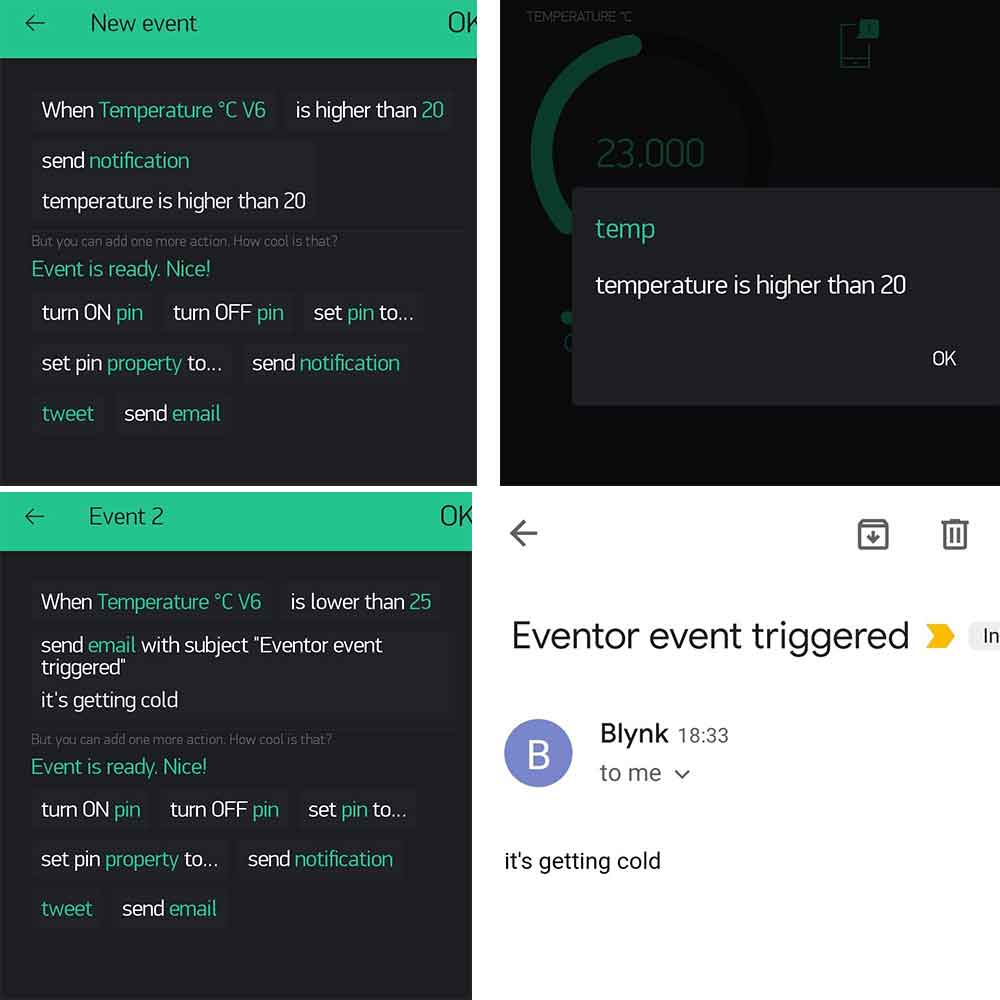
- If we want to read sensor values remotely and get notified on certain events, Blynk has a perfect solution for that. For example, if you want to maintain temperature in the room or let’s say a greenhouse and get notified when the temperature is lower than higher from a certain value, you can go to the Widget box and choose Notification or Email. If we set the notification option, we will get push notification by the app (don’t forget to give permissions)and for the Email option obviously we will get an email. This will not work without the Eventor Widget. Here you set up an event, in my case if the temperature is lower than 25, I will get push notification and if higher than 20, I will get an email.
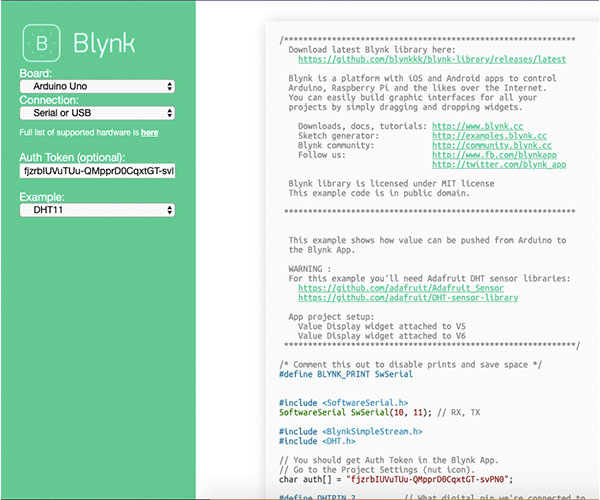
- Now we can do connections. As I mentioned above, Blynk has a very good example browser , where you just add options and set the example and the code is being generated automatically. So I have generated the code and copied that to the Arduino IDE.
#define BLYNK_PRINT SwSerial #include <SoftwareSerial.h> SoftwareSerial SwSerial(10, 11); // RX, TX #include <BlynkSimpleStream.h> #include <DHT.h> // You should get Auth Token in the Blynk App. // Go to the Project Settings (nut icon). char auth[] = "wzbjGe-U658FP_c18CIhynGo9js15_5c"; //paste here your auth token #define DHTPIN 2 // What digital pin we're connected to #define DHTTYPE DHT11 // DHT 11 DHT dht(DHTPIN, DHTTYPE); BlynkTimer timer; // This function sends Arduino's up time every second to Virtual Pin (5). // In the app, Widget's reading frequency should be set to PUSH. This means // that you define how often to send data to Blynk App. void sendSensor() { float h = dht.readHumidity(); float t = dht.readTemperature(); // or dht.readTemperature(true) for Fahrenheit if (isnan(h) || isnan(t)) { SwSerial.println("Failed to read from DHT sensor!"); return; } // You can send any value at any time. // Please don't send more that 10 values per second. Blynk.virtualWrite(V5, h); Blynk.virtualWrite(V6, t); } void setup() { // Debug console SwSerial.begin(9600); // Blynk will work through Serial // Do not read or write this serial manually in your sketch Serial.begin(9600); Blynk.begin(Serial, auth); dht.begin(); // Setup a function to be called every second timer.setInterval(1000L, sendSensor); } void loop() { Blynk.run(); timer.run(); }- We need to download and the Blynk library , The Adarfruit sensor library and the DHT sensor library and include in the code.
- Connect the board to the computer and upload the code to the board.
- Now we have to connect the board to the internet. For that we should:
- Open the terminal and go to the folder, where the Libraries are located. Go the the Blynk folder, then Scripts
- Install Brew
- Instal socat running the command
brew install socat - Run this script :
blynk-ser.sh - Run the command
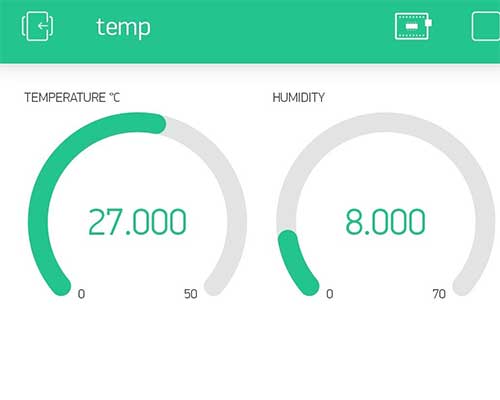
./blynk-ser.sh -c /dev/cu.usbmodem14101. Here instead of the “usbmodem14101” should be the name of the port which the Arduino board is connected to. - Open the project on your Blynk app, press the Run button and enjoy the results. Unfortunately, I did not manage to play with humidity, but I tried to increase and decrease the temperature and get notifications.
Download the code here.
- ConclusionDuring this week I used two new input devices: 2 axis joystick and DHT11 sensor and got acquainted to principles of their work. Besides that, I have learned the basics of Processing and got to know about the Blynk app. All of the mentioned above are very important experiences for me, as they can help to develop my abilities of programming and electronics design. I enjoyed the application programming process and feel that even having basic knowledge and good navigation skills you can create funny, beautiful and useful projects.
Category:
AlumniDate:
February 3, 2022